Nano is a simple text editor which is installed on most Linux distributions such as Fedora by RedHat Inc. Nano is easy to use and always gets the job done. For some strange reason, many of the additional built-in features are not enabled by default. So let’s fix this by first enabling line numbers. Once we have those, changing additional settings is much faster because I can tell you exactly where to look.
Nano – How to enable line numbers
To edit Nano’s configuration file, I open the terminal and type: sudo nano /etc/nanorc
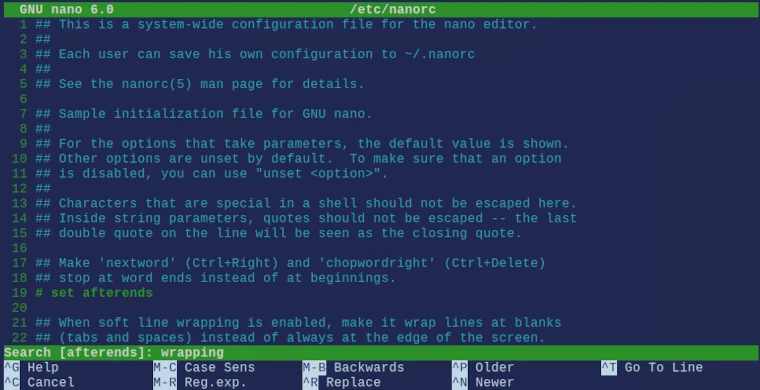
This will open the nanorc file which is all we need to edit in order to enable additional options. As shown in the image pictured above, the Nano editor can be configured to show line numbers. Line numbers are a must and as we shall see, make editing files much quicker.
Here is how to add line number to Nano. With the nanorc file open (as root so that it can be saved), use the Ctl + W key to display the search field. Then, type: linenumbers (and press enter).
You will see a line with the following text:
## Display line numbers to the left (and any anchors in the margin).
# set linenumbers
Use the up/down arrow keys (on your keyboard) to navigate the cursor in between the # and s (as in set linenumbers) and press the backspace key once. If done right, this will delete the pound (# hash) sign.
To exit the editor, press Ctl + X followed by Y key and finally, press enter. This will save all changes and exit the editor. The next time Nano is opened, the line numbers will show on the left-hand side as in the screenshot image above.
Nano has more useful settings which enable the use of the mouse and even manipulate the foreground and background colors. I will cover these options shortly. To be continued ….
More nanorc tweaks
As you can see by now, all of the built-in features Nano has need to be enabled by removing the # pound sign. Additional features that I enables are:
- set autoindent
With this setting enabled, pressing the enter key will automatically place the cursor at the same tab stop as the previous line. This comes in handy when editing code. - set tabsize from 4 to 2
By default, the tab with is a bit too big so cutting it in half will balance the text much nicer. - set mouse
After enabling that setting, I can just click with the mouse inside Nano. Cool! - set smooth
This is a scrolling enhacement. - set softwrap
I like that when I write long stings, the text does not get cut off. Enabling the softwrap feature prevents that. - set tabstospaces
If Nano is used to fix minor Python code issues then the indent MUST be in spaces and not tab. Most code editors automatically convert tab to spaces which is why I configure Nano to do the same.
In addition to enabling the above features, I have also changed the title color for and background because I wanted to match the green/blue look of my terminal. Those settings can be found towards the end of the nanorc file. For all of the available settings that can be enabled, consult the nano-editor.org webiste
Final thoughts
Nano is from “yesterday”, meaning that it’s on old text editor that originated when the terminal was it. So why does Linux still include this awkward little text editor? Well, the answer is quite simple. It’s very small in file size and best of all, Nano can edit system files. Because of that, Nano can be used if a graphical user interface is not available.
Once one uses Nano here and there, the advantage of quickly changing something becomes attractive. Not a day goes by where I don’t make changes to a file with nothing more than Nano. The big fancy GUI editors all call home. Because of that, editing sensitive files like password and server login texts, are best done with an editor that still respects our privacy.
Coding and more extensive text editing is not practical as there are better programs than Nano. For large text files, LibreOffice is a must. For smaller text files, Gnome Text is more than sufficient. Coding is done with Visual Studio or Codium which is my code editor of choice.
What about Vim?
Back in the days, Vi (and later on, Vim) was amazing. These days, Vim has a following among people who like to show how elite they are. If VS Codium or Visual Studio weren’t available, then one would have to consider learning how to use Vim. Thankfully, we don’t have to.
Now it’s time to try Nano for yourself
If you haven’t use Nano yet then I encourage you to just take it for a spin. To do so, open a terminal and navigate to your Documents directory. If you are new to the terminal then simply type:
cd /home/yourusername/Documents
If you have substituted yourusername for your actual user name, then you will be in your home directory. You can issue the pwd (print working directory) command to make sure. Once in your Documents directory, type this into the terminal: nano test.txt
This will open the Nano editor with an empty file. Type in some text and when done, press Ctl + W to save it. Then you can add more text or, when done, press Ctl + X followed by y and enter.
This will save everything and close the editor.
In a nutshell, that is how you use Nano. Nano is best suited to edit system files. Making Linux more efficient means editing various system files and settings which I will cover in future posts.